Chapter 1: Document structure design
The concept of Database or “Table” Files
Designing the Table structure
Creating new Table Files
Basic items
Index
No entry
Define item properties
Explanation
Limitations and limitations
Storing Table Files
Change Table structure
Copy Table structure
The concept of Table Files
The Database files called “Tables” in DittoBitto are the basic files used for storing the data entered in program and show the data in list spreadsheet format. In other words, a database file is a collection of records consisting of fields such as employee number, name, department, position, resident registration number, telephone number, and address as shown below.
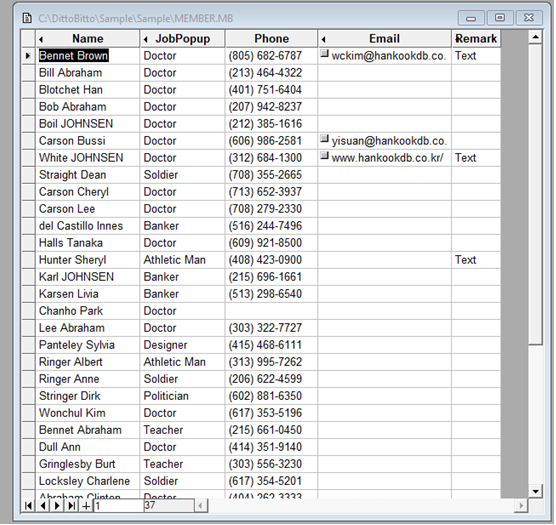
Examples of Fields inside each table file are: product name, unit price, product photograph, etc. for each product or item. Personnel record cards that store employee names, phone numbers, addresses, personal details, and photos. Daily sales slip to process the sales date, price, quantity and amount of each itemw Book management that handles book titles, authors, book cover photos, plot lines, etc.
In addition, tables can be used to manage information such as museum relics management, video photo management, customer management, inventory management, and tax management.
Design the Table structure: Some people are just better at this than others. I am not one of those people. You should:
- Analyze your business
- Outline the flow of information
- Build the table in a logical manner.
- There are books written on just how to do this.
I can guarantee you that you will be modifying your Table at some point; which is very easy to do. Put the fields that first come to mind into your Table and add others as you go. Although the time spent on layout will save you time in the long run.
1. Analyze your business: The work analysis of the materials to be managed is as follows.
First, think about how you want to process data and get results for the business you want to manage. Second, I think about the amount of each material and its usage amount, and how important each one is. It is not necessary to go through the above process every time you create a Table. However, if you need to process the data using the full-scale model and the job analysis is insufficient, you will have some difficulty in correcting it after the execution.
After the analysis of the work is completed, the Table structure is determined based on the analysis result. That is, determine the name, type, size and format of the Fields to be managed. It’s not as hard as it sounds.
2. Determine the document structure
Field Name
Field names are names describing the information in that field. In the process of data processing, each item is read or specified by field name. Therefore, it is recommended to define the name of the field so that it is easy to understand what’s in the field. There are several rules for creating field names.
- Use up to 63 bytes (Byte) Hangul or Hanja can be up to 32 characters, Up to 63 characters can be used.
- You can only use Hangul, Hanja, English, numbers, and underscore ( _ ) for the item name.
- Ex: Name_ for a name or _ 12 for month.
- When using alphabetic characters, case is distinguished so total and Total are recognized as two different field names.
- You can not use numbers as the first letters of field names. Ex: You can’t use “2017TaxAmount” but can use ” _2017TaxAmount”.
- Directives, special characters and symbols can not be used as field names. Like: +-/\=
- You can not duplicate the same field name in the same Table.
Type of a Field: The Type is an area that defines the type of data that is entered into each field. Therefore, users should consider the following before defining Types.
You have to decide whether each field is a [string ( str ) which is an alphanumeric character], a number ( int ), a large number ( bigint ), a number with decimal places ( double ), a date ( date ), a time ( time ), a ( bool ) which is Yes or No question, a large text box ( text ), an image / picture ( image ) or you are calling another program like an email address ( file ). The range of data that can be stored for each type is different and the range is as follows.
Type Length Remarks
- ( str ) is an alphanumeric character 1 ~ 255 Byte Used to input multiple characters such as Korean, English, numbers and special characters even phone numbers if you want them to look like: (123) 123-4567
- ( int ) is a whole number used to process numerical data less than 1 billion (-2,147,483,648-2,147,483,647)
- ( bigint ) is a big integer used for processing more than 1 billion numerical data (-9,223,372,036,854,775,807-9,223,372,036,854,775,806)
- ( double ) is a number with decimal places. Used for cash or any numerical data that needs decimal points. It’s a bigint but has up to 9 decimal points.
- ( date ) is for setting a date
- ( time ) is used for Time (24 hour concept)
- ( bool ) is for Yes / No logic, used when processing data such as TRUE / FALSE (Displayed as ‘*’ when data is input.)
- ( image ) is used to process image data as shown in the figure. (Available picture formats include BMP, GIF, JPG, PCX, TGA, TIF, etc.)
- ( text ) is used for processing large TEXT data greater than str type limited to 1 ~ 255 Byte.
- ( file ) is for a variety of the file formats. Text document (txt, html, rtf ..), image document (bmp, gif, jpg ..), audio document (wav, mid ..), video document (avi, mov, mpeg ..) It is used to manage files used in applications such as process documents (hwp, doc ..) and spreadsheet documents (xls ..) or homepage, e-mail.
Size of Field: When you finish entering the Type of the Field, you’ll need to specify the Size of each field which is just it’s length. The length specified here means the maximum length of the data to be input to each item. The unit of length is processed by byte. “Hangul, Chinese character, special character” occupies 2 bytes per one character. In addition, “English, number, symbols”.
You don’t want to make the fields very much longer than what is needed as it does make the overall Table larger for storage purposes. Ex. a phone# is (123) 456-7891 is 14 characters long but you may want to make the field 20 characters long so you could add an ext# on the same line. But you don’t want to make it 50 characters long as it just waste space unless the field length of 50 is needed for some other reason.
The only two Types that a user can specify the length on is character(str) and file(file). Length can be defined up to 255 bytes (Byte). The rest of the Types lengths are internally handled automatically, so you do not need to define them yourself.
Display Format of Field: You can specify the Format for fields in numeric or date Type. When a Format is specified, data is displayed in the work Form specified on the screen.
Format for the numeric format (integer, big integer, real number) Ex. When the data becomes 1000 or more, a comma is displayed every 3 digits. 1,234,567. When (None) is selected and the data is more than 1000, no comma is displayed. 1234567
Select decimal point of Double Number: If it is a decimal number, call “double “, is used the decimal point is displayed. Decimal point length is 0 to 9
The decimal point is displayed as 2 by default.
Display Format of Date: The year is 4 digits, month is 2 digits and day is 2 digits.
Year, month, and day Format options:
- Month, day, year, mm/dd/yyyy
- Day, month, year, dd/mm/yyyy
- year, month, day, yyyy/mm/dd
Let’s check the following Tables for example.
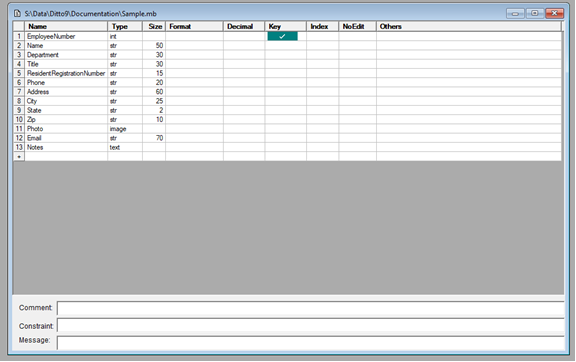
<Table structure screen>

<Data entry screen>
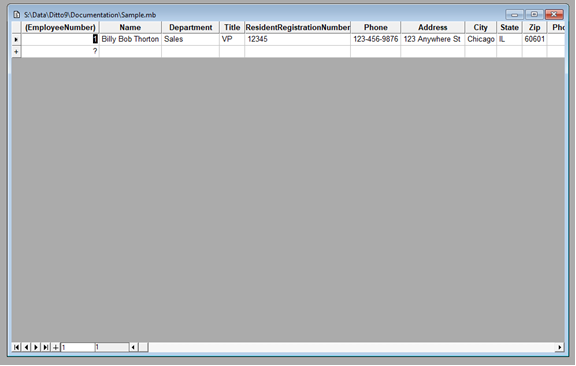
Create a new Table: If you want to create a database(Table) to manage the data on the staff directory, first determine the structure of data through job analysis.
On Each Field Select: Name Type Size Format Others
These are the fields we are going to use in the Table.
- EmployeeNumber – using ” int ” for a number only, no symbols
- Name – using “str” at 50 characters for first & last name; Up to 255 characters are available for English
- Department – using “str” at 30 characters; Up to 255 characters are available for English
- Title – using “str” at 30 characters; Up to 255 characters are available for English
- ResidentRegistrationNumber – 15 using characters for numbers and symbols (-); Acct-1234567
- Phone – using “str” at 30 characters; phone number has number and symbol (-) (123) 456-9876
- Address – using “str” at 60 characters; Street address
- City – using “str” at 25 characters;
- State – using “str” at 2 characters; State abbreviations
- Zip – using “str” at 10 characters; New Zip codes have a number and a symbol (-) 60601-1234
- Photo – using “image”; Photo Item to receive pictures
- E-mail – using “str” at 70 characters; to manage e-mail addresses
- Notes – using “text” for large note field;
2) Create item name, format, length, and display. To select the Type, Size and Format on a keyboard, move the cursor to the desired field, use the up and down arrow keys then press the Enter key. If you are actually creating a Table, you can enter the 13 fields in the design screen as described above.
Primary Key: A primary Key is a field that represents each record in a Table. In our example, ” EmployeeNumber ” is the Key. This is a unique number which cannot be used on any other EmployeeNumber record in this Table. So if you assign an employee the number 1, no other employee can have the number 1. It is not necessary to set it unless you are building a relational database or need a unique number for tracking.
Advantages of Primary Key: Fields set as Keys have the following effects: Prevents data in the entry from being entered as duplicate entries and blank spaces. Because index files (* .FX) are automatically created on Keys, performance functions such as searches or sorts are extremely faster. When building a relational database, Keys are used as the connection fields between two Tables.
Setting a Key:
- 1) Open the Table either from [Design Schema] under [View] or click the Design icon.

- 2)Click on Key field. A check mark will appear in the field.
- Save your Table.

- If you select [View Table] in the [View] menu or press the Back icon
 , parentheses are displayed before and after the field name set as the Key as shown below. (EmployeeNumber)
You can set a Key only in the Types: str, int, bigint, time and date. If you set a Key on an existing Table with data already entered and there is blank or duplicate record, the second or multiple records will be deleted as this field must not be blank and must have unique data in it.
Things to know when you enter Key Field data: There are two important rules when entering data into Key entries. You can not enter the same data in duplicate in a Key field and it cannot be left blank. In general, the Key settings are used primarily for ‘Table connection’. Since the Key field becomes a link between two Tables, if there is a blank or duplicate data, it can be a problem that it is hard to determine what subTable will refer to.
FX Files: When the Key is set, the index file ‘* .FX’ is automatically created and ‘* .FX’ files are automatically updates every time a record is added, modified or deleted.
Setting Multiple Keys: Up to 10 Keys can be set in one Table. If two or more basic Keys are set, each field does not individually serve as a single Key but acts as a Key field by combining the records of the all Keys. For example, when you set the ‘EmployeeNumber’ field as the Key in the Table that manages the employee list, the ‘EmployeeNumber’ field can not be duplicated. However if multiple Keys are set, like ‘Employee Number’ and ‘Social Security Number’ , even if the data is duplicated as in either field it’s OK but not data in “both fields”. So two employees could have same ‘Employee Number’ but not the same ‘Employee Number’ and ‘Social Security Number.
Releasing Keys: After opening the Table to released the Key, you must be in Design mode.
- Move the cursor to the Key area with check mark
- Click with the mouse or press the Spacebar to uncheck the check mark in the Key field box.
- After saving the Table, select [View Table] from the [View] menu or click the [Back] icon. Key index file (.FX) are automatically deleted when the Key is released.
Indexes: Just as an index or table of contents can be used to find specific content in a book, the database uses indexes to quickly locate specific records. For example, if you frequently search for information by name in a file that stores information about your student’s address book, the search speed will slow as the number of files increases. If you set an index at this time, you can search the data at a faster rate.
Setting the Index
- Open the Table in Design mode and then select [Change View / Structure] menu.
- Move the cursor to the index area of the field to set the index.
- Click with the mouse or press the Spacebar.
- After saving the Table, select [View Table] in the [View] menu to return to the View Table status.
When the index is set, an index document (.F # n) is automatically generated. The extension of the index item is ‘F0 ~ Fn’. For example, if you set an index on the third item, the extension of the index document is appended with ‘.F2’.
Updating the Index: If you encounter unexpected results during data retrieval (finding, selecting or sorting) of data on indexed fields during the processing of the data, you need to update the index documents.
- Close the Table to update the index.
- Select [File – Diag file] in the [File] menu.
- When the Table selection dialog box appears, select the corresponding Table and press ‘Select’ button
Release the index
- After selecting the Table in the structure design state,
- Move the cursor to the index area marked with check mark
- Click with the mouse or press the Spacebar. The check mark disappears.
- Save the Table and return to ‘View Table”.
No Edit: Use the [No Edit] function when you want to prevent certain fields from being over written by the keyboard in the Table field. However, you can still modify the field using the Procedure or Popup List function.
- Open the Table in the ‘Change Structure’ screen.
- Move the cursor to the No Edit field of the item that you want to prevent keyboard input, and click with the mouse or press the spacebar. A check mark will appear. ( √ )
- After saving the Table, select [View Table] in the [View] menu to return to the ‘View Table ‘ status and you will not be able to use the keyboard to enter data into that field.
Please note that the above function does not affect the Forms. Therefore, if you want to have the same effect when you create a Form, you must select [Enable / Disable] in the Form you are applying. Please refer to Chapter 9, “Preventing Input on Form Fields”.
Defining Field Comments: This function is used when the cursor moves to a specific field and you want to display a note or explanation on the screen. For example, move the cursor to the ‘Department’ field and type: “Please enter one of the following: Accounting, Trade, Sales, or Materials.”
In the structure change state
- 1) Move the cursor to the field called (Comment) at the bottom of the screen
- 2) Press the<Ctrl> + <Tab> or use the mouse
- 3) Write something in the field.
- 4) After saving the Table, return to the Table view. If you move the cursor to that field, your statement will appear.
Setting Limitations: The Constraint field located below the Comment field is defined by limiting the input range of the data input to a specific field. The Constraint notification is a message letting the user know that the inputted data is in violation of that field. For example, the data entered in the department field must be entered only as “Accounting Department, Trade Department, Sales Department, Material Department”. Please enter it again. ”
In the structure change state
- Move the cursor to the field, ex: (department) for which you want to limit the input value.
- Press <Ctrl> + <Tab> on the keyboard or move the mouse pointer to the Comment field column. Then create a conditional expression in the Constraint field column like below and define the message by moving the cursor to the Message field column.
conditional expression: Department == “Accounting Department” || Department == “Trade Department” || Department == “Sales Department” || Department == “Material Department”
In the Message field type: You have entered an incorrect department
3. After saving the Table, return to the Table view. If you enter the “general affairs department” in the ‘Department’ item, a message appears on the screen as shown below. “You have entered an incorrect department”
Saving Tables: Once the structure of the Table is complete
- On the [File] menu, click [Save or Save as]. Or click the “save” icon on the top screen.
- When the [Save or Save as] dialog box appears, select the location (folder) where the Table will be stored and enter the Table name and click the ‘Save’ button. (The extension is automatically entered as ‘.MB’.
Change Opened Table Structure: Sometimes you may need to change the structure of the Table, such as field name, type, size, format or add or delete fields. In this case, if the structure of the Table is changed, a physical change of the Table will occur. Therefore, it is not a problem if there is no data entered in the Table. However, if the Table has data in it, the data in that field may be lost when the Table structure is changed. If you are increasing the size a ‘str’ field from 10 to 20, no data will be lost. But if you change it from a 20 to 10 in size; any data that was over 10 characters in length will truncated to 10 characters. If you change a ‘str’ field to ‘int’ field, most if not all data will be lost.
Here’s how to modify the structure of the Table: Select [Design Schema] from the [View] menu or you click the ![]() icon. Change the Table and save.
icon. Change the Table and save.
Adding Fields to a Table: To add a ‘gender’ field to the ‘EmployeeList.mb’ : Move the cursor to the area with the last blank line ‘+’ symbol, then define the field name (Gender) and type, size and format. When we get to Forms, you will have to add it to your Form for data entry.
Inserting Fields: For example, to add an entry date field into a Table and you want it placed between the fields “name” and “department” which are let’s say on line 5 and 6 respectively. You add the new field “Gender” and the bottom of the Table. With you mouse, highlight the field Gender and slide it up into place between fields lines 5 and 6. It will become field 6 and Department will become field line 7. Or before you create the field Gender, you can highlight the field Department and then click [Insert Item] on the [Edit] menu and then press the right mouse button which will add a new line moving Department down one line so you can the field Gender in its place.
Delete an item: Use when you want to delete an field or delete a blank line.
- Move the cursor to the item to be deleted,
- Select [Delete Item] from the [Edit] menu then press the right mouse button and select the Delete Line menu. Warning: If you delete a field, the data in that field will be deleted as well.
Move Field Location: To move the ‘Gender’ field behind the ‘Social Security Number’ field.
- When you click the gray block in front of the Field (Gender) to change the location, the line will become highlighted in “black”.
- Mouse to the front block of the highlighted line and moving the pointer, press the left mouse button. Press and hold to move up or down to the location you want to place the field. When you reach the desired position, release the mouse button.
Change Field Type: Again, if you modify the Type of a field that has data in it, some or all of the data may be lost.
- The ‘str’ type can not be changed to another type unless the data in the “str” field is an integer value. If it is, you can change it to an “int” integer or a”double” type.
- Ex: A123 ‘str’ type after modification to integer type), it will become 123
- You can not change the ‘str’ type to ‘text’ type, but change the ‘text’ type to ‘str’ type.
- If you change the ‘double’ type to the ‘integer’ type, all values after the decimal point are lost. Example: 321.12 (double type) will come out as 321 (integer type)
- When changing the type of ‘big integer’ or ‘double’ to ‘integer’, since “integer is smaller than the big integer number ‘, the existing value may disappear.
- You can change the type of ‘integer’, ‘big integer’, and double to ‘str’ type. However, if the length of the numeric value is longer than the length defined in the size field, it may truncate the field.
- You can change the ‘Date’ type to ‘Text’ type. Example) 2000.01.01 (date type) will become 2000.01.01 (text type).
- If you want to change the ‘text’ type to the ‘date’ type, make sure that the data is entered as ‘date’ type. Example) 1999.12.30 (Text type) will become 1999.12.30 and 0099.11.01 will be 99.11.01. if entered like 20000101, data will be lost.
- You can not change the ‘Date’ type to the ‘Integer’ type, or the ‘Integer’ type to the ‘Date’ type.
Change the Size of a Field: If it is a ‘str’ type you must define the length. If you modify the length, it is not a problem to increase the existing length, but when the length is reduced, if there is data in the field and the length of the field is made smaller than the length of the entered data, the data of the excess portion is lost. Therefore, before reducing the length, you must think and reduce the maximum length of the data entered in the field. For example, if the current length is reduced from 8 bytes to 6 bytes .. Example) ABCDEFGH will become ABCDEF (GH character disappears.)
Canceling Table Structure Change: To return to the original structure without saving the modified Table structure, On the [Edit] menu, click [Original Structure]. When you close the Table or return to [View Table], click the ‘No’ button when the Save dialog box appears.
Note: A backup file (*. ~ MB) is automatically created when an invalid structural change is saved. You can recover it. However, please be sure to check if the change of Table structure is checked during back-up of ‘Table information’. For details on backup documents, refer to “Chapter 13 Back Up Information”
Shortcuts used to change Field structure:
Hotkey Function
Enter Move cursor to next field
Spacebar Format and display, default item, item set and release
F5 Copy item name before
Ctrl + Insert Insert item
Ctrl + Delete Delete item
You may get the Error message when changing structure when someone else is using the same Table. (“The content can not be modified because it is in use by another user”). When changing the structure of the Table, please check the following points when the following message appears.
- Is one or more of the same Table open or in use by another user?
- Are the written documents, forms, or query documents drawn up by the corresponding Table open at the same time?
- Are you working on the same Table on the Network?
If any of the above is true, an error message will be displayed saying “Cannot modify the content because it is in use by another user”. In order to resolve this problem, all relevant files except the current Table must be closed.
Copy Table Structure: To create a new Table by copying only the structure of an existing draft Table, proceed as follows.
In the structure Design state ..
- Under [Others], select the option “Rename File”
- When the Rename File dialog box appears, enter the new name of the new Table to be copied.