Chapter 2: Tables
- Open And Close Tables
- Entering and editing data
- Delete, Repair, Insert
- Changing the Table Screen
Adjusting the spacing of Fields
Adjust the height of a record
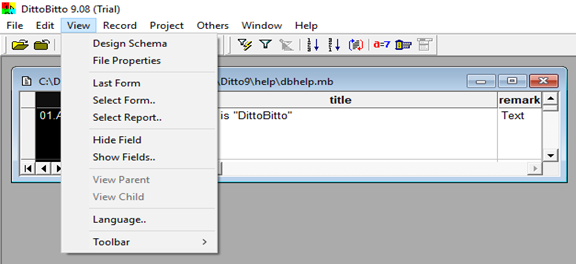
Hide Fields
View Field
Move Field location
- Entering Special Characters
- Entering data in a topic
- Entering data in picture items
- Entering data in paper items
- Inputting data using Popup List
Example: Enter Field and unit price using Popup List
- Copy all data to another Table or Copying some data to another Table
- Appending data from other Tables
Example 1. Reading other Tables of the same File structure
Example 2. Appending from other Tables with the same File structure
Example 3. Reading data from other Tables using conditional
Open and close Tables
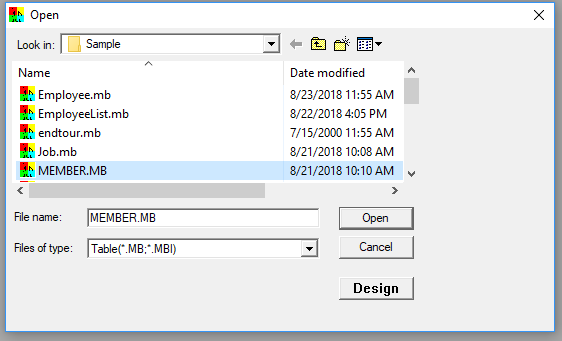
Open Table: When you open a Table from menu [File] – [Open] – [Table] or use icon ![]()
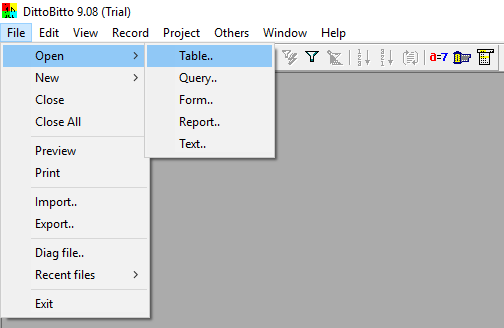
When the Open Table dialog box appears, select the name with the mouse and press the ‘Open’ button
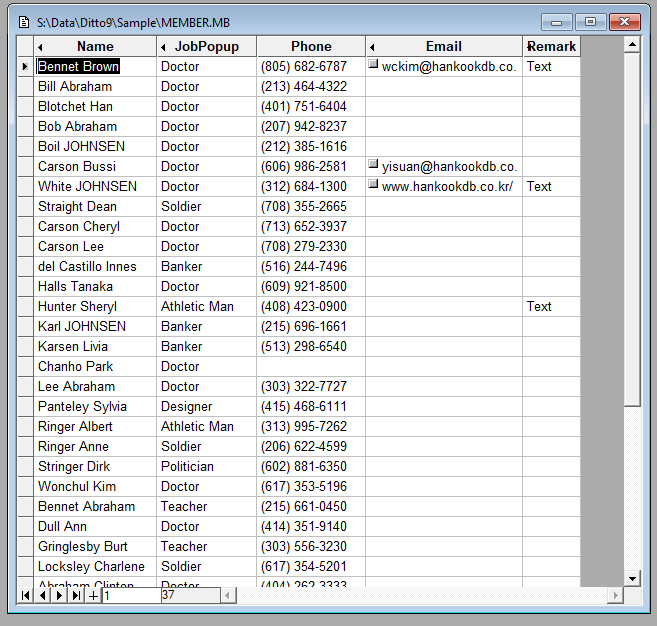
Example of an open Table.
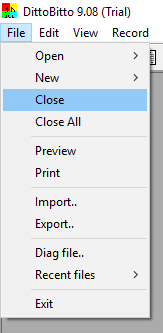
Closing the Table: If you want to close your Table, menu [File] – [Close] or [Close All]. Or use Close icon ![]()
Enter and edit data: Adding new data to the Table or modifying existing data can only be done with the original Table (MB) and the attached Form (FD). A Form is the work screen covered later.
Add material
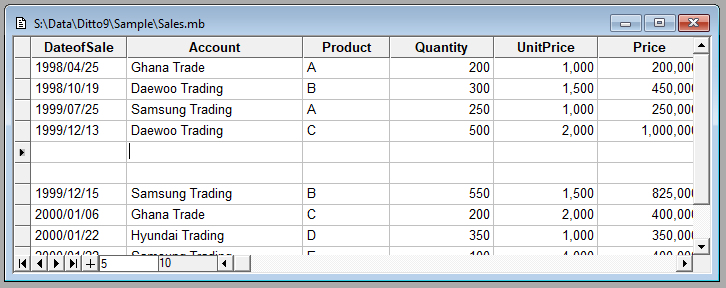
To add new Record: Click on the bottom blank record or move the cursor to the bottom line on the Table with the ‘+’ symbol in the front block and Click it. Later when we get to Forms, we’ll show you how to add a ‘New Record’ button to the Form.

……………….↑
If you enter data in the first field(column) and move to the next field(column), a new blank record is created below it.

Note: When you add a new record, the rest of the fields will default to null. For numeric items (int, bigint, double), 0 is input by default. A null value is an unqualified value. In ‘DittoBitto’ it shows as null when no value is entered. You can delete the existing input data with Delete key.
Save the data: Typically, other programs must perform a Save command to save the entered or modified data. In other words, it is processed on a file-by-file basis. However, in ‘ DittoBitto ‘, when the user adds or modifies data, the cursor moves to another line (record). When closing file, it is saved automatically, so there is no need to issue a separate data save command.
Modifying the data: When using the mouse in the work area of the Table, the mouse pointer has the shape of ‘ | ‘. If you want to modify the data, move the mouse pointer to the character you want to modify and click it. When using the keyboard to modify some existing data, move the cursor to the data you want to modify and the data becomes highlighted. If it is, press the INSERT key. If the cursor blinks after entering a character, use the arrow keys to move to the position you want to modify and then modify.
Reasons to press the Insert key: If you try to enter the data with the record highlighted, the data will be deleted and be replaced with the new data. If you make a mistake while typing it, do not move the cursor, but go to [Edit] – [Undo].
Keyboard shortcuts for editing data with the keyboard:
| Shortcuts | Affect |
| Home | Cursor moves to the beginning of current field |
| End | Cursor moves to end of current field |
| → | Use to move the cursor to the right |
| ← | Use to move the cursor to the left |
| Delete | Used when deleting the character where the cursor is located |
| Backspace | Used to delete a character in front of the cursor |
Use the [Undo] function to correct input mistakes: You will need the ability to restore the current entry or record to its original state. So the following options are used.
[Undo] in the [Edit] menu: It restores the data of the field to its original state before modification. However, it is valid only before the cursor moves to the next field and can not be recovered if the cursor is already moved to another field.
[Undo Record] in the [Edit] menu: It is used when you want to recover the record that is being modified right before the modification. However, it is valid only before the cursor moves to the next record. If the record is already moved to another record, the record is saved automatically and can not be recovered.
![]()
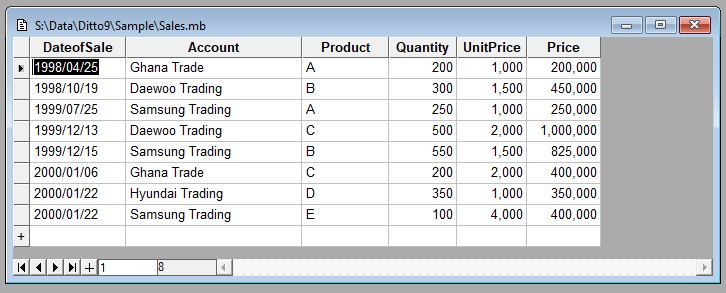
Moving to a record:
| ◀: Moves to the first record in the Table.
◀: Moves to the previous record where the current cursor is located.
▶: Moves to the next record where the current cursor is located.
▶ | : Moves to the last record in the Table.
+: Creates new record and is the last record of the Table. Add new Record.
In above Image
<1>: Record number where the current cursor is located
<30>: Total number of records in the Table
Moving the cursor to a record at a specific location: Click on the <1> area and enter the (record) number you want to move to and press the Enter key.
Delete, Repair or Insert a Record:
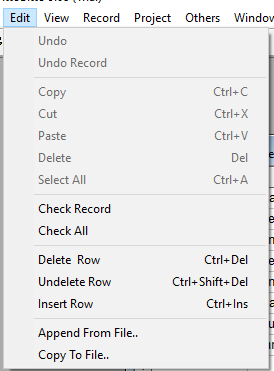
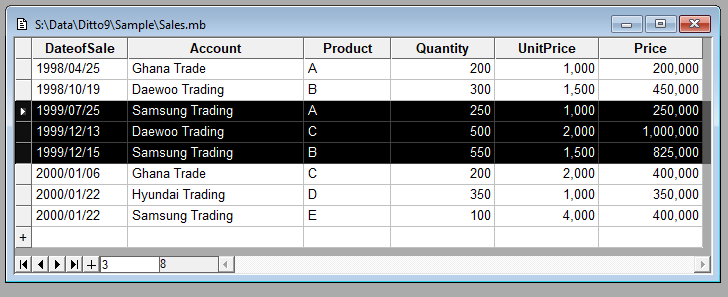
Deleting a Record: Move the cursor to the record (Row) you want to delete. Select [Delete Row] from the [Edit] menu.
The record (Row) where the cursor was positioned is not erased, but the color of the character is blurred with a light gray color, and a ‘~’ mark appears in the front gray button (record selection button).
In ‘DittoBitto’, the records that have been deleted are only marked for deletion and can not be completely erased so you can recover them again.
If you want to completely erase the deleted data, you can use the [Pack Records..] function in the [Record] menu. For details, please refer to Chapter 3, “Summary”. You can also use the [Ctrl] – [Delete] buttons to delete a record or the [Ctrl] – [Shift] – [Delete] buttons to undelete a record. This works on blocks of record too; which is covered next.
Delete multiple contiguous records in bulk:
When deleting multiple adjacent records, hold down the gray button column on the far left of screen and move up or down. Depending on the direction the mouse is moving, several records are highlighted. At this time, select [Delete Row] from the [Edit] menu or the [Ctrl] – [Delete] keys.
Undelete a Record: This function is used to recover deleted records. Move the cursor to the record you want to recover and select [Undelete Row] from the [Edit] menu or just press the <Shift> + <F7> keys or the <Ctrl> + <Shift> + <Delete> keys.
As soon as the color of the font displayed in the light gray color returns to its original state, the tombstone (~) disappears.
Note: If you want to delete or recover only records that meet certain conditions in a batch, use [Conditional Delete] and [Condition Undelete] in Chapter 3 ‘Search for data’.
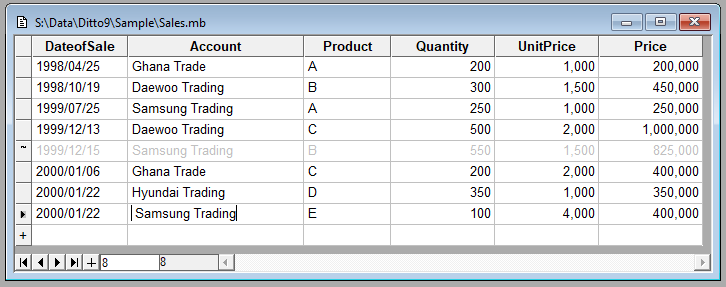
Inserting a Record: The ability to add new blank record between existing records. Move the cursor to the position where you want to insert the new record, select [Insert Row] from the [Edit] menu or press the <Ctrl> + <Insert> keys.

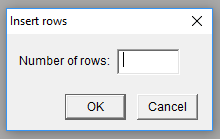
There will be as many blank records (Rows in front of the cursor as shown below. I will insert 2 rows.
Note: When inserting a record:
- Up to 9,999,999 records can be inserted at one time
- It is not possible to insert a record in a Table that has a Key set
- You can use this feature even on Tables that are shared by other users on the network.
Changing the Table’s Screen: There are several ways for the user to change the screen design of a Table to improve screen viewing and convenience.
Adjusting the Width of Columns: From the field names listed at the top of the Table, move the mouse pointer between two field names. While holding down the left button of the mouse, move left or right to adjust the width of a column.
Note: Adjusting the spacing of fields does not change the Table’s actual field lengths.
Hide Records: This function is used when you want to hide certain records so you only see the records that you need to enter data into the Table. Select the record name you want to hide with the mouse. On the View menu, click [Hide Fields]. The symbol ‘◀’ appears in front of the record name that has been hidden.

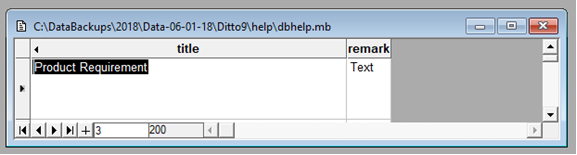
The column in front of ‘title’ is now hidden.
Hide records keyboard
Move the cursor to the record you want to hide and press Ctrl + Right ( Direction Key) to hide the item on the right one by one with the current cursor.
Hide multiple adjacent records at once
If you move one item left or right without holding your hand while holding down one of the items to hide, the items will be highlighted according to the direction of movement. At this time, [Hide Item] will hide all selected items at once.
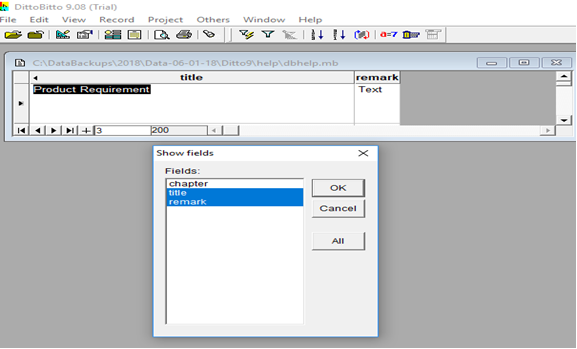
Show Fields
To show hidden fields just click on the field or fields that are hidden and Select [Show Fields] under [View] Click on the fields to want to see again.
You can also just select ‘All’ and all records can be seen, see below. To show records using the keyboard, move the cursor to the item immediately after the hidden item, and press the ( Ctrl + Left ) direction key to show the item on the left one by one with the current cursor.
Moving a Record’s Location in the Row: To change the location of records on the screen. 1) Highlight the record you want to move with your mouse. 2) Press again with the mouse and the mouse pointer will change to the shape of a hand. Drag the mouse to the desired position and release the mouse. You use the arrow keys on the keyboard for right, the (right) direction key, for left, the (left) direction key.
Entering data from Text File: If you want to manage a large text file exceeding the 255 characters, use the ‘text’ type. The size of the data that can be entered in the ‘str’ type is 255 characters. After closing the Table, 1) Move the mouse pointer to the correct text field, ( the field will say Text) and double-click it or press <Ctrl> + <Enter>. 2) Enter the data at the bottom of the screen.
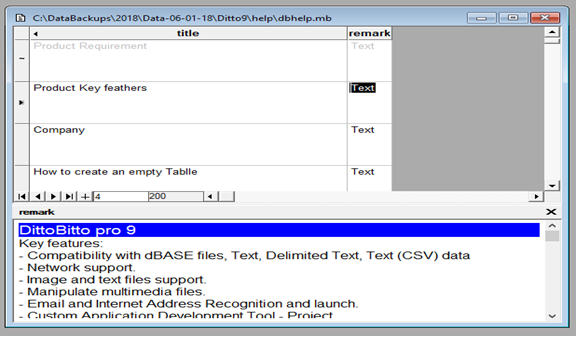
3) Move the cursor to another record after the input is completed, or you can close the text area by clicking the X. You can use the <Ctrl> + <Tab> keys to move the cursor on the Table and text area using the keyboard.
Entering Text using a Text File: If the existing data is written as a text file, you can import the text file by: 1) Move the cursor to the text area, 2) Right-click in the text area and select [Link to External File] or [Connect to external document].
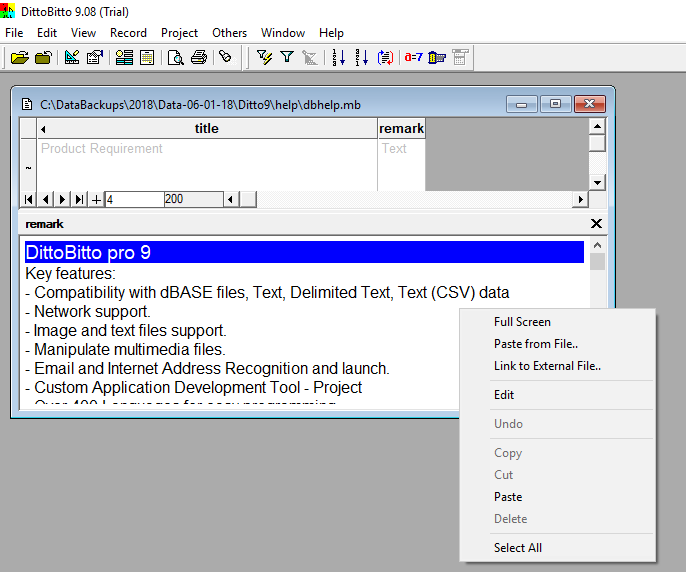
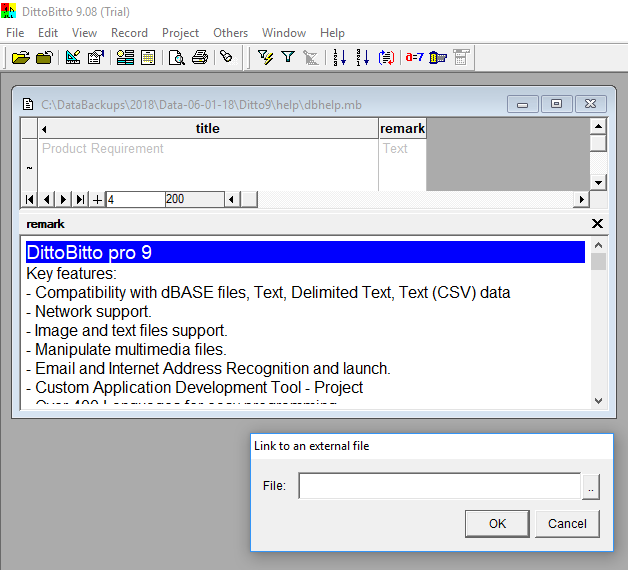
3) When the dialog box appears, select the file and press the ‘Select’ button, then “OK” button.
Edit keys used in the Text Area
The editing keys used in the text area are as follows:
| Key | Function |
| ↑ | Moves the cursor up one row. |
| ↓ | Moves the cursor down one row. |
| → | Moves the cursor right one row. |
| ← | Moves the cursor left one row. |
| Home | Move the cursor to the beginning of the line. |
| End | Moves the cursor to the end of the line. |
| PgUp | Moves one page up on the screen. |
| PgDn | Moves one page down on the screen. |
| Ctrl+Home | Move the cursor to the beginning of file. |
| Ctrl+End | Move the cursor to the end of file. |
| Backspace | Deletes one character before the cursor. |
| Delete | Deletes one character after the cursor. |
| Enter | Moves the cursor to the first position on the next line. |
Note: If you have a large text file, it may be better to use a text editor and save the text file. Then call it from DittoBitto by using the [Link to External File] option.
Entering data in Image Type: When managing image data such as photographs or images, use the image type of the data structure format. The types of picture files that can be processed are bmp, gif, jpg, pcx, tga, and tif.
Entering a Picture into a Table: 1) Move the cursor to the picture item. 2) Double-click with the mouse or press <Ctrl> + <Enter> key to display the picture area at the bottom of the screen.
3) Move the mouse pointer to “Images”, right-click and Press [Link to External File]
Things to know when Linking Text and Image Items: (1) The data of the text item and the image record are stored in the ED document. Both text and images can be in plain format (letters, integers, large integers, real numbers, dates, times, unlike other fields. Therefore, if you send your Table to others, you should also copy the ‘.ED’ files along with the MB, FD, DIC and any F? file. (2) The difference between [Paste from File] and [Link to External File] is an ‘external document link location method’. When you Link to External File, only the file location about where the Text or Image are saved in the ED files. This method keeps for databases smaller in size. Paste from File stores the Text or Image in your database.
Pasting Data into Table: Options include text documents, image documents, audio documents, file or website addresses used in applications such as video or word processing documents, spreadsheet documents, e-mail, address, and so on.
Enter the file format: 1) Move the cursor to the Image or Text field. 2) Right-click and select [Paste from File]. 3) When the document opening dialog box appears, select the file and press the ‘Select’.
Calling Outside Programs: If you want Dittobitto associated with the file to be executed and the specified file to be opened: (Good for opening email program, playing a video or music, opening PDF files. 1) Move the cursor to the document item and press the right button of the mouse. 2) Press the [Open] or [Play] menu, Select or double-click with the mouse. However, the connection program is executed because the information about the application program associated with the file format specified in the Windows system is registered. If the connection program is not registered, it can not be executed.
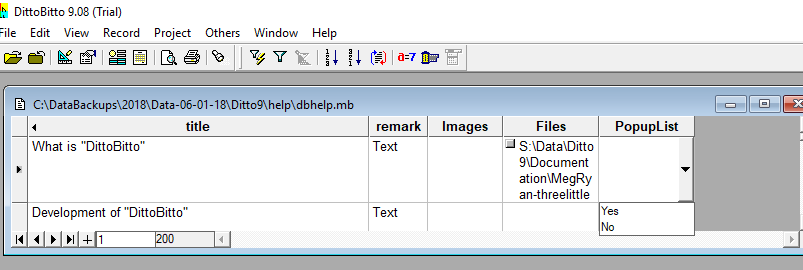
Popup List: Popup Lists are usually small Tables that contain frequently used data that you can pull into your main Table from a drop-down box. Ex: To fill fields with data like Yes/No, maybe hours of operation or a list of the days in a week. Looks like Ex: below
Entering data using the Popup List: You can select one of the lists as shown below without inputting the data directly from the background document. This is called Popup List. To use this function, you have to define it as follows.
Setting the Popup List: 1) Create a Table to be used as a popup list. <PopupList.MB>. 2) Open a Table to add “PopupList” field, select [Design Schema] from [View] menu. 3) Move the cursor to the “Others” field on the record you want to set the Popup List. 4) Press the right mouse button on “Others” field and Select [Set PopupList]. 5) Define the attributes of the Popup List.
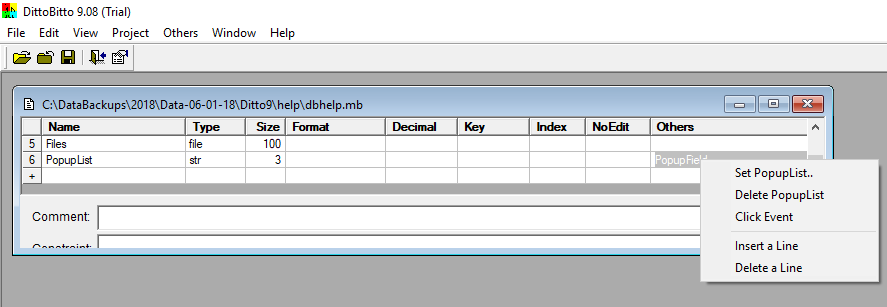
Defining the Popup List Properties:
Source File: Source File is the Table name that contains the Popup data, Like Yes/No
Source String: The Source String is the name of the field in Source File that has the data. Usually these are String fields.
If there are several fields to be displayed, separate the 1st field name from the 2nd field name with a comma (,). Ex: Name,Address,City,State,Zip.
I named my Popup Table, “PopupList” and the field name “PopupList” too. If you select one record in the Popup List, you must direct the data to the record you want the data entered into on your main Table. So my main Table is dbhelp.mb and I have created a field in it called “PopupList”. My popup data in another Table I created called “PopupList”. In Table “PopupList”, I have created a record also named “PopupList”. So the data in Table”PopupList” and its record”PopupList” will be pulled into my main Table “bdhelp” and into its record “PopupList”.